Canned response is a predefined text that is created and stored in your live chat system and answers a customer's question. It's useful to have canned responses answering most popular general questions, like providing the company contact information, hours of operation, online store delivery terms, etc. This will reduce response time in many chats and increase your customers' satisfaction.
There are several ways to create canned responses for your live chat account:
- Directly from your chat agent app - either by creating a new response via the Canned Responses window or by saving some particular chat message as a new response. This option is convenient for chat agents and allows them to create their own, agent-specific sets of predefined messages.
- Using Create Canned Response form on Canned Responses page in your account Control Panel. This option is convenient when you need to add a new response to the list of existing ones.
- Bulk adding from a spreadsheet. This option is convenient when you are setting up your predefined answers from scratch or adding a big number of new answers.
Importing canned responses from a spreadsheet
While using the form, responses are added one by one, importing from a spreadsheet allows you to create all of them in just a few clicks:
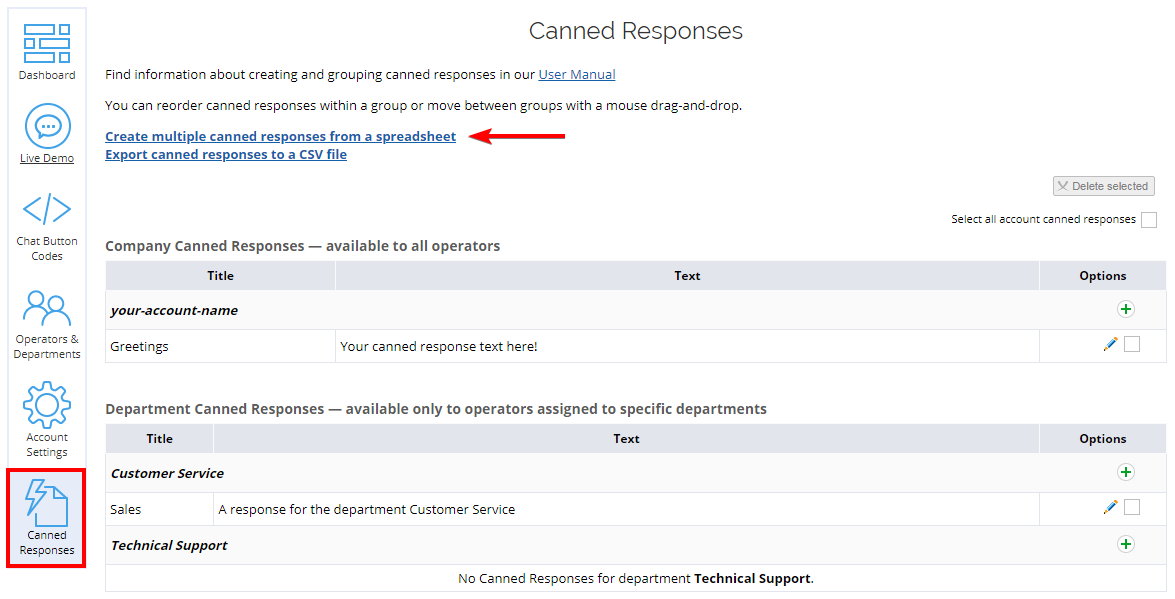
- Click the link "Create multiple canned responses from a spreadsheet" at Canned Responses page
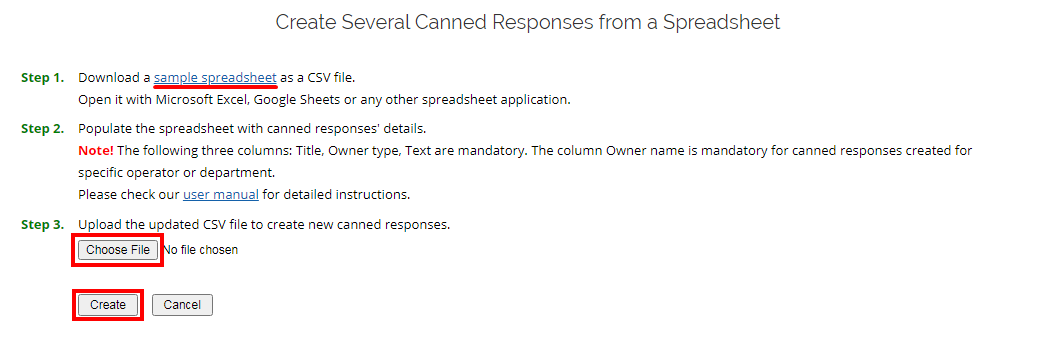
- Download the spreadsheet template (sample spreadsheet) you will be working with. Template is a spreadsheet containing just one line with four column names and saved in CSV format. It can be opened in a spreadsheet application like MS Excel or LibreOffice Calc
- Fill out the template - detailed information about each column requirements is available below on this page
- Save and upload it to your account to create a set of canned responses
Some applications may ask about encoding of the file and the separator when you try to open the sample file. Make sure to select Unicode or UTF-8 as encoding, and comma as separator.

Spreadsheet template columns
The spreadsheet template contains the following columns:
- TITLE. Required field. The canned response title. Should be unique within the same group (company, specific department pr operator) or sub-group of your responses (see "Canned responses grouping" further down this article).
- OWNER TYPE. Required field. Should contain one of the 3 key words indicating the level the response should be assigned to:
company,department, oroperator. Please make sure there are no spaces at the end. - OWNER NAME. Required field. Depending on the OWNER TYPE, should contain:
- account name (or leave it empty) if OWNER TYPE is
company; - department name (Operators and Departments > Departments table > Title column) if OWNER TYPE is
department; - operator nickname (Operators and Departments > Operator Profiles table > Nick Name column) if OWNER TYPE is
operator.
- account name (or leave it empty) if OWNER TYPE is
- TEXT. Required field, the response body. Line breaks can be applied. URLs and emails are formatted automatically to be clickable.
Once you have your template populated with data, proceed to Step 3 of the "Create Several Canned Responses from a Spreadsheet" form - upload the file back to your account:
- click "Choose file"
- select your spreadsheet
- click "Create"
If you get an error, try searching for it in the "Possible errors" section of the "Managing canned responses" category in the user manual, or contact us in the support chat, we will be happy to help you.
If you need to add more responses later, you can do it using another sample file in the same. It won't delete or overwrite any of your existing responses.
Canned responses grouping
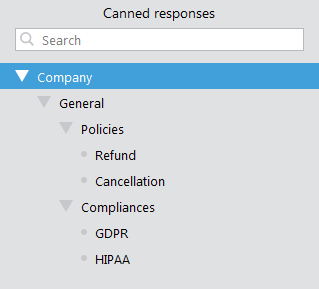
To group your canned responses you have to use a special syntax in their titles:
[group/subgroup/sub-subgroup/...]Canned response title A nesting principle is used here so the final result looks like a tree structure in a file explorer on your computer, when there is a root directory with (or without) sub-directories which in their turn might have more sub-sub-directories, etc.
To illustrate it, here is an example of a grouping:
 [General/Policies]Refund
 [General/Policies]Cancellation
 [General/Compliances]GDPR
 [General/Compliances]HIPAA
This creates one main group "General" and two sub-groups within it, "Policies" and "Compliances", which have two responses each. Getting back to the explanation of template columns and specifically - the Title column, you cannot have two identical titles within one group or sub-group that is last in the structure. In our case, you cannot have two titles "Refund" within the group "Policies", or two "GDPR" within the group "Compliances".
It's not necessary to create groups/sub-groups, it's absolutely up to you and for your convenience.
Canned responses templates for your usage
You might also take a look and try the live chat canned responses templates we made for different cases that are common for most companies. We gathered several versions of responses for each case, using very basic titles, so you will need to review and edit them before uploading. We included explanatory text within square brackets "[]" in the responses, but please bear in mind that it's not variables but serves to explain what and where should be used instead - a company name, operator's name, customer's name or a specific situation or an action. Your agents might need to replace text and brackets with their own versions that correspond to a situation they are handling.
- Greeting a visitor
- Clarifying the issue
- Requesting more information
- Apologizing for an issue
- Informing customer about issue progress
- Dealing with complaints
- Putting on hold
- Transferring chat
- Unable to meet a request
- Gratitude for the feedback
- Reaction to gratitude
- Offering further assistance
- Dealing with unresponsive customer
- Wrong company chat
- Handling trolls
- Finishing chat
