Customer experience is very important for companies' success. Post chat surveys provide a valuable opportunity to get feedback directly from customers about the quality of service they receive during their interaction with the live chat support team, allowing the company to decide on the best ways to improve customer satisfaction and loyalty.
There are a lot of different types of surveys. For our live chat we have chosen two types - with a list of questions asking users to rate their experience from 1 to 5, and with a question which requires "yes" or "no" as an answer. Each survey is complemented with an open-ended question and a comments area where users can express themselves in their own words.
The default texts of the surveys were composed in such a way as to be relevant, universally applicable, and written in a proper style. However, if you want to make your survey more associated with your business, we will show a few ways to safely customize it.
Before you start
Before you start customizing your survey, there are a few things to consider:
- Post chat survey results are included in chat statistics only if one of the templates from the gallery is selected. If you manually uploaded a survey to your account, even if no changes had been made to it, the statistics will ignore it. This said, first, make sure that selecting a different template from the gallery wouldn't be enough. If not, then keep on reading further.
- Post chat survey is strictly tied to your chat window styles, so you need to edit it carefully. We recommend changing only texts. Surveys use the same colors and fonts you chose for your chat widget, they are hardcoded on the server side and cannot be changed via survey files.
How to activate post chat survey
Post chat survey is activated by default in all new accounts. However, if you would like to update the existing one you need to:
- Login to your account and follow to Account Settings > Post-Chat Survey.
- Download the archive yourAccountName-post-chat-survey.zip.

What's inside it:
- css folder;
- images folder;
- file post-chat-survey-confirmation.html;
- file post-chat-survey-form.html;
- file post-chat-survey-script.js;
- image thumbnail.png (image that you see at the Account Settings > Post Chat Survey page);
- file window-features.

From all this bundle you would only need post-chat-survey-form.html and style.css located in the css folder (for advanced users only).
The window-features file can be opened in a text editor like Notepad or Notepad++. It has settings for the visible area within the chat window where the survey is loaded. In particular, it defines the window width and height which by default are set to 316 px and 496 px. If you kept the default size of your chat widget (370 x 590), don't change these values. But while editing the survey, you need to take them into account so that no part of the survey goes beyond the visible area.
The fastest way to check the changes you made is to launch the post-chat-survey-form.html file in a browser after each change (however, the confirmation window can be only checked during a chat).
To test the final editing results in real-life environment you will need to:
- pack all files back into the archive keeping the same names of all files and the archive structure, then upload it back to your account;
- go to the Live Demo page in your account;
- launch the operator console from there and wait about 30 seconds till the the chat button goes online (you can just refresh the page to enforce the chat button status change);
- initiate a test chat (you don't even have to accept it in the console), then close it through "X" and click "Leave" (or "Yes" if the "Allow chat transcript emailing" option is disabled in your account at Account Settings > Live Chat Window > Features) to quit chat and trigger the survey.
Part 1. Basic: edit HTML
All components of the survey are encoded in the post-chat-survey-form.html file. Here is how you can customize the survey template with only this file involved:
- change texts: you can replace texts of the header, questions and confirmation
- add more questions in a 5-star survey or delete an existing question. If you want to have more than two questions, you might need to make them short enough so that they don't add to the survey height too much and push the submit button out of the users' sight
- hide the comments section (open-ended question and text area)
To start making updates launch the post-chat-survey-form.html file in a text editor (a simple one that has no formatting options, like Notepad or Notepad++) and take a look at the code.
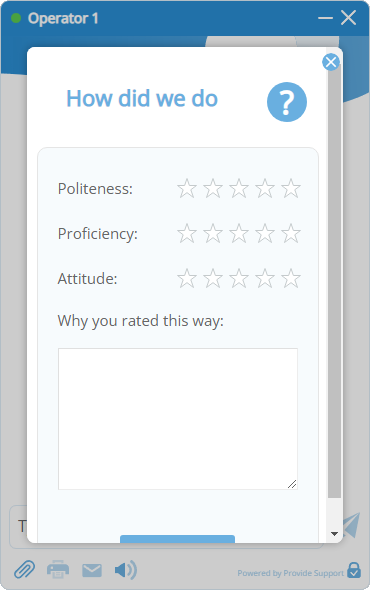
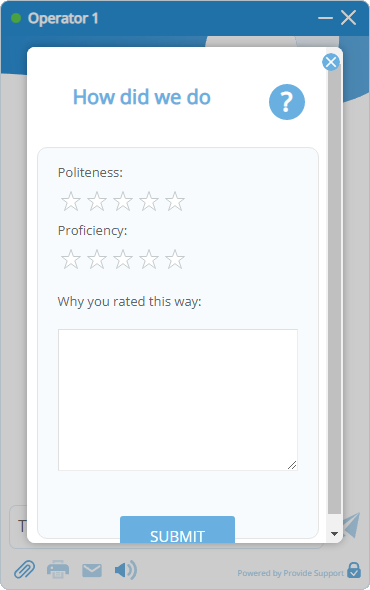
Edit survey header text
Post chat survey header is a bold text at the top of the survey.
The 5-star template has its header in the following block of the code:
 <header class="vertical-align-wrapper">
 	<h1 class="vertical-align">How did we do</h1>
 	<div class="vertical-align">
 		<div class="circle">?</div>
 	</div>
 </header>
To change the header text, just replace it in the code (text within tag <h1>).
The question mark is added as a separate graphic element of the header, but you can remove it to gain space for a few more symbols in favor of the header text. To remove it, delete the line <div class="circle">?</div> from the block (or you can comment it out putting the tags <!-- and --> at each side of the line so that you can have it back at any moment). You can also change the question mark to any other character (including Unicode entities).
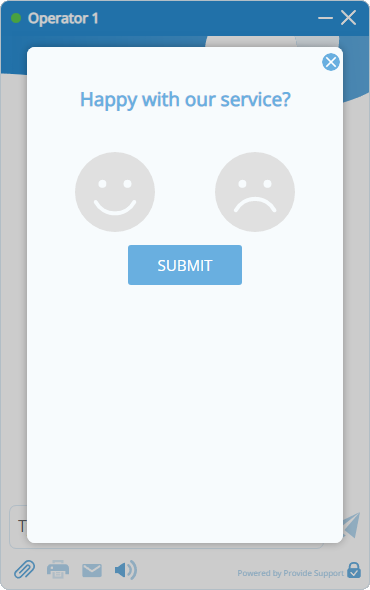
If you use a smiley/thumbs survey template, your header block will look like this:
 <header>
 	<h1 class="vertical-align-bottom">Happy with our service?</h1>
 </header>
This template's header allows longer texts without breaking the layout. You can change text in the same way.
Edit questions (5-star survey)
This part exists only in the 5-star survey template. All question blocks have the same pattern and are created with this code:
 <div class="row-rating vertical-align-wrapper">
 	<div class="rating-label vertical-align">Politeness:</div>
 	<div class="rating-box" id="Politeness">
 		<input id="rating1-5" type="radio" name="Politeness" value="5">
 		<label for="rating1-5">5</label>
 		<input id="rating1-4" type="radio" name="Politeness" value="4">
 		<label for="rating1-4">4</label>
 		<input id="rating1-3" type="radio" name="Politeness" value="3">
 		<label for="rating1-3">3</label>
 		<input id="rating1-2" type="radio" name="Politeness" value="2">
 		<label for="rating1-2">2</label>
 		<input id="rating1-1" type="radio" name="Politeness" value="1">
 		<label for="rating1-1">1</label>
 	</div>
 </div>
First goes the block wrapper which includes the question text and a block with rates in the form of stars. Make sure to strictly follow the instructions below to keep your survey functional.
Add more questions to the survey:
- Copy one entire block and paste it to the empty space of the code right above
<div class="row-descriptions">and below the last block of questions:<div class="row-rating vertical-align-wrapper">
<div class="rating-label vertical-align">Proficiency:</div>
<div class="rating-box" id="Proficiency">
<input id="rating2-5" type="radio" name="Proficiency" value="5">
<label for="rating2-5">5</label>
<input id="rating2-4" type="radio" name="Proficiency" value="4">
<label for="rating2-4">4</label>
<input id="rating2-3" type="radio" name="Proficiency" value="3">
<label for="rating2-3">3</label>
<input id="rating2-2" type="radio" name="Proficiency" value="2">
<label for="rating2-2">2</label>
<input id="rating2-1" type="radio" name="Proficiency" value="1">
<label for="rating2-1">1</label>
</div>
</div>
<div class="row-descriptions"> - Replace the question-text in
<div class="rating-label vertical-align">question-text:</div>, e.g.:<div class="row-rating vertical-align-wrapper">
<div class="rating-label vertical-align">Attitude:</div> - Change the ID in
<div class="rating-box" id="ID-of-the-question">to a new one that would reflect the question, e.g.:<div class="row-rating vertical-align-wrapper">
Note! Answers to the new question will appear under this new ID in chat transcripts.
<div class="rating-label vertical-align">Attitude:</div>
<div class="rating-box" id="Attitude"> - Replace values of the attribute
namein each<input>of the block with the new ID from the previous step, ex.:<div class="rating-box" id="Attitude">
<input id="rating2-5" type="radio" name="Attitude" value="5">
<label for="rating2-5">5</label>
<input id="rating2-4" type="radio" name="Attitude" value="4">
<label for="rating2-4">4</label>
<input id="rating2-3" type="radio" name="Attitude" value="3">
<label for="rating2-3">3</label>
<input id="rating2-2" type="radio" name="Attitude" value="2">
<label for="rating2-2">2</label>
<input id="rating2-1" type="radio" name="Attitude" value="1">
<label for="rating2-1">1</label>
</div> - Update IDs of each
<input>and attributesforof each<label>of the block (the partrating#-#) - change the first digit of the values to the serial number of the new question (for example, you add the third question):<div class="rating-box" id="Attitude">
Note! Each input must have a unique id throughout the survey.
<input id="rating3-5" type="radio" name="Attitude" value="5">
<label for="rating3-5">5</label>
<input id="rating3-4" type="radio" name="Attitude" value="4">
<label for="rating3-4">4</label>
<input id="rating3-3" type="radio" name="Attitude" value="3">
<label for="rating3-3">3</label>
<input id="rating3-2" type="radio" name="Attitude" value="2">
<label for="rating3-2">2</label>
<input id="rating3-1" type="radio" name="Attitude" value="1">
<label for="rating3-1">1</label>
</div>
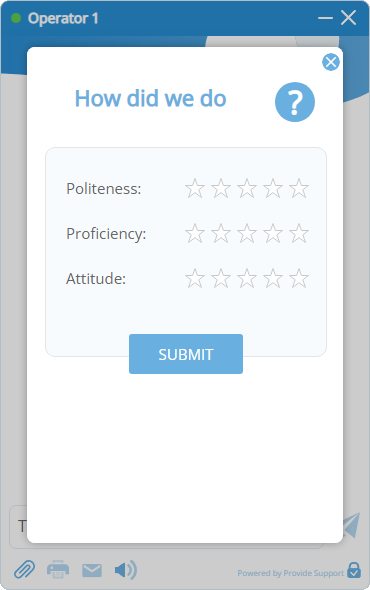
Here is what we get after editing:
On the above example you see how the "Submit" button got partially hidden from the visible area and the scroll bar appeared. To fix this, you can remove the comments section, make the text area smaller, or reduce text size. But for the two latter options you would need to edit the CSS file of the survey, and it requires advanced skills. If you're on it, we'll talk about it in Part 2 of this article.
Delete an existing question block:
Select the block and delete it from the code (or comment it out using the tags <!-- and -->).
Change an existing question:
Follow steps 2, 3 and 4 of the instructions from Add more questions to the survey.
Hide the comments section
The same way as with the header, each template has its own code for the comment section.
5-star survey comments block looks like this:
 <div class="row-descriptions">
 	<div class="descriptions-label vertical-align">Why you rated this way:</div>
 	<textarea name="Comments"></textarea>
 </div>
And the smiley/thumb survey comment block looks like this:
 <div class="row-rating">
 	<div class="rating-label vertical-align">Comments:</div>
 	<textarea name="Comments"></textarea>
 </div>
To hide the comment section from the survey, simply delete the block from the code, or comment it out using tags <!-- and -->. Here is how the survey from our example looks with the comment section removed:
And this is the standard smiley/thumb survey with no comment section:
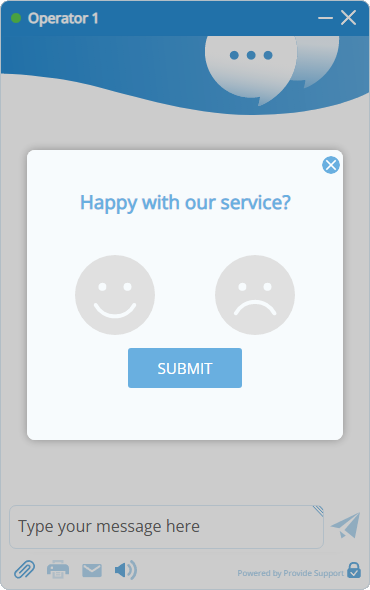
It has now a lot of empty space. This is the case when you can edit the window-features file and reduce the height of the visible area:
Edit confirmation text
The confirmation window appears after a user submits the survey. The block with its content is located at the beginning of the <body> section of the code.
The survey template confirmation block has the following code:
 <div class="success-content">
 	<header class="vertical-align-bottom">
 		<h1 class="word-wrap">Thank you!</h1>
 	</header>
 	<div class="post-chat-survey">
 		<h2>We greatly appreciate your feedback</h2>
 		<div class="button-send">
 			<button class="submit-btn" onclick="onClose();">CLOSE WINDOW</button>
 		</div>
 	</div>
 </div>
The smiley/thumb survey template confirmation block has this one instead:
 <div class="success-content">
 	<header>
 		<h1 class="vertical-align-bottom">Thank you!</h1>
 	</header>
 	<div class="post-chat-survey">
 		<h2>We greatly appreciate your feedback</h2>
 		<div class="button-send">
 			<button class="submit-btn" onclick="onClose();">CLOSE WINDOW</button>
 		</div>
 	</div>
 </div>
You can modify the following parts: header text (tag <h1>), confirmation body text (tag <h2>), and close button label (within tag <button>).
Part 2. Advanced: edit CSS
Important: This section requires knowledge of CSS: basic concepts, rules and syntax. It supposes that you know how to create and modify a CSS code. We recommend skipping this part if you are not familiar with it.
The file responsible for the survey styling is called style.css and is located in the css folder. Here is what you can safely customize in your survey template through CSS:
- header and questions font size
- header question mark shape and size (5-star survey)
- comments area height
- move stars under questions to make space for longer texts
We advise to not edit anything else, as some changes won't simply work, and others may break the survey layout and elements positioning.
We will continue working with the segments of code in the post-chat-survey-form.html file. These segments generate different parts of the survey – header, questions, comments section, confirmation texts. However, before we start let's look closer at the tags and class attributes as these are the elements which the styles are applied to.
Font size editing
The CSS-property responsible for the font size is called font-size. The values may differ in different survey types and for different survey elements. Try changing the values and check the result. If you want to add more questions to your 5-star survey, you may try smaller font sizes to fit everything.
To locate properties faster in the CSS code, press CTRL+F in your text editor and search for the tag or the class name.
Survey header
The header text is formatted with the <h1> tag, the style rules for it are described in this peace of CSS code in the style.css file:
(5-star survey)
 h1 {
 	margin: 29px auto;
 	max-width: 280px;
 	font-size: 22px;
 	font-weight: bold;
 	line-height: 40px;
 	color: #529ad3;
 	display:inline-block;
 }
(thumb/smiley survey)
 h1 {
 	margin: 40px auto 0;
 	max-width: 280px;
 	height: 65px;
 	font-size: 19px;
 	font-weight: bold;
 	line-height: 25px;
 	color: #529ad3;
 	display:inline-block;
 }
Type a new value instead of the default 22 or 19, but make sure to not add spaces between the value and the unit px. Save changes once done.
Editing style properties for <h1> will also affect the header of confirmation window.
Question Mark (5-star survey)
The style for the white question mark in a colored circle is assigned in the post-chat-survey-form.html file through the attribute class="circle" and is determined by the following CSS rule:
 .circle {
 	width: 40px;
 	height: 40px;
 	background: #529ad3;
 	margin-left: 10px;
 	-moz-border-radius: 20px;
 	-webkit-border-radius: 20px;
 	border-radius: 20px;
 	text-align: center;
 	line-height: 40px;
 	color: #fff;
 	font-size: 32px;
 	font-weight:bold;
 	display:inline-block;
 	position:relative;
 	top: 5px;
 }
Find the property font-size and alter the value.
If you also want to resize the colored circle, you will need to play around with values of the following properties: width, height, line-height.
width and height define the circle size. But once you change them, you will notice that the question mark has drifted. And line-height is responsible for this.
Decreasing its value will move the question mark up, increasing will move it down.
You can change the circle to a square too, by deleting (or commenting out with /*, and */) the following properties:
 -moz-border-radius: 20px;
 -webkit-border-radius: 20px;
 border-radius: 20px;
Rating questions and question of the comments section
For the questions text, the style is determined through the rating-label and descriptions-label classes, here is their CSS codes:
(5-star survey)
 .rating-label, .descriptions-label {
 	color: #666666;
 	font-size: 15px;
 }
(smiley/thumb survey)
 .rating-label {
 	color: #529ad3;
 	font-size: 15px;
 	font-weight:bold;
 	display: inline-block;
 	padding: 0 0 0 10px;
 }
Update the value of font-size.
If you use a 5-star survey and want longer questions, you can move rating stars under them. To do that, delete vertical-align from <div class="rating-label vertical-align">The question text:</div> in the post-chat-survey-form.html file in every question block of your survey.
Comments area
It is quite easy to locate the comments area element in the code: it's a single line <textarea name="Comments"></textarea> and style is applied directly to the tagname:
 textarea {
 	width: 218px;
 	height: 120px;
 	margin: 10px 20px 0 20px;
 	padding:10px;
 	font-size: 14px;
 	border-left: 1px solid #e0e0e0;
 	border-top:1px solid #e0e0e0;
 	border-right: 1px solid #ededed;
 	border-bottom: 1px solid #ededed;
 	outline: none;
 	font-family: inherit;
 	color:#222;
 }
All that you need from this group of rules is height. It actually defines the default height of the area which is resizable from the user's side. To make it convenient for users to enter their feedback, an area 2-3 lines high is enough, so you can take advantage of this property and reduce it in favor of other elements that require more space.
You can remove it at all, including the question, if you don't need it. We explained how to do it in the section Hide the comments section of the Part 1 of the article.
Confirmation window – header and text
Confirmation header font size is automatically edited together with the survey header since they both use the same tag. As for the confirmation text, the style is applied to it through the <h2> tag. Here is its CSS code and the font size property:
 h2 {
 	padding: 30px 25px 10px 25px;
 	font-size: 17px;
 	color: #666666;
 	line-height: 25px;
 	text-align: center;
 }
Part 3. Expert: edit rating stars, smiley faces and thumbs images
Images in the surveys are created as vector graphics in SVG format. You can change their appearance by updating their SVG sources, or you can replace them with other images in SVG/PNG/JPG format. The image files are located in the images folder of the archive.
If you already have suitable samples of SVG images to use in your survey instead of the default ones, then you can simply replace them with your files in the images folder. To not do any extra editing in the codes, keep the same file names. If you use files of different forman, you'll need to update the files' names in CSS styles anyway.
We can show you how to change the orange color of stars when they are hovered over.
Open the file star-on.svg in a text editor and find in the code the following words: fill and stroke. fill means the fill color of the star, stroke – the color of its frame. They are in the HEX format widely used in HTML and CSS - #rrggbb. Replace values of both attributes with the desirable color and save changes. To check the result, open (or reload) the post-chat-survey-form.html file in a browser and move your mouse over the stars.
Over to you
Please remember that once you upload the survey to your account, you won't be able to track the survey results in your chat statistics module. You can try to collect the post-chat survey results and customers' comments from chat transcripts and add them to your database, but this would require additional programming from your end, since we have no ready-to-use solutions for this purpose.
We can suggest general steps to follow to extract the survey results from chat transcripts:
- create an email account dedicated solely for chat transcripts and add it to Account Settings > Chat Transcripts in your Control Panel;
- write a piece of code that will check the email account for new messages, take the TXT part of the messages and parse it;
- the parser should look for the block at the bottom of the transcript emails called "Post Chat Survey" and get the data from it;
- lastly, it should add the data retrieved to your database.
The choice of the programming environment to create the parser is entirely up to you. Your team can use any tools they are comfortable with to implement the suggestion.
You can also try adding Google Analytics tag to your post-chat survey:
- create a new property in your Google Analytics account;
- get the script they offer for manual integration and insert it to the post-chat-survey-form.html file immediately after the opening
<head>tag; - indicate "messenger.providesupport.com" as your Streaming URL.
By default, Google Analytics will track page visits (i.e. post-chat survey loads), but you can create custom reports in it to get more data.
